
Adobe Photoshop is an incredibly powerful tool used by photographers, designers, and artists worldwide. One of its fundamental features is its editing capabilities, allowing users to modify and enhance images to achieve their desired results. When it comes to editing in Photoshop, two primary methods are commonly employed: destructive editing and non-destructive editing. Understanding the difference between these two approaches is crucial for efficient workflow management and maintaining the integrity of your original image. In this blog post, we’ll delve into the concepts of destructive and non-destructive editing, explore their benefits and drawbacks, and provide practical examples to showcase their usage.
Destructive Editing
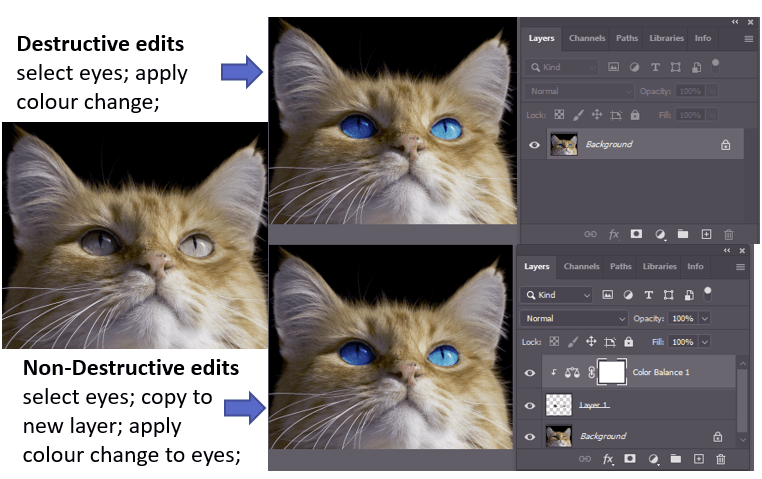
Destructive editing refers to making direct changes to the original image without preserving the original data. When you apply an adjustment or effect directly to the image layer in Photoshop, it alters the pixels permanently, which means the changes cannot be reversed or modified later without affecting the original image. This editing method can include actions such as cropping, resizing, using the eraser tool, or applying filters directly to the image layer.
Benefits of Destructive Editing:
- Simplicity: Destructive editing provides a straightforward approach to making quick changes without worrying about complex layer structures or additional file sizes. It is useful for simple and immediate modifications. Example: If you want to resize an image for a specific purpose, such as for a website banner or social media post, you can directly apply the transformation to the image layer and save it.
- Speed: Since changes are applied directly to the image, the processing speed is often faster compared to non-destructive editing methods. This is beneficial when working on large image files or when applying time-sensitive edits. Example: When editing a batch of product photos for an e-commerce website, applying basic adjustments like levels or brightness/contrast directly to the image layers can help speed up the editing process.
- Compatibility: Destructive edits are universally compatible, meaning the modified image can be opened and viewed on any software or device without additional requirements. This is useful when sharing images with others who might not have access to Photoshop or the specific adjustments used. Example: If you need to send a quick preview of an edited image to a client who doesn’t use Photoshop, saving the modified image in a universally compatible format like JPEG ensures they can view it without any issues.
Drawbacks of Destructive Editing:
- Irreversibility: Once you save your changes, it’s challenging to revert to the original image or modify the edits without starting from scratch. This lack of flexibility can be a disadvantage, especially when experimenting with different creative ideas or making precise adjustments. Example: If you make several changes to an image using destructive editing and later realize you want to modify one of the earlier adjustments, you would need to recreate the entire editing process from the beginning.
- Loss of Data: Applying adjustments directly to the original image layer can lead to a loss of pixel information, reducing the flexibility for future modifications. This loss of data can impact the image quality, especially if multiple adjustments are made consecutively. Example: Suppose you apply several filters, such as blurs and sharpening, directly to the image layer. Each filter modifies the pixel data, potentially leading to a degradation of image quality or introducing artifacts.
- Inaccuracy: Since you cannot see a live preview of your edits, it may be challenging to gauge the final outcome accurately. This can result in a trial-and-error approach, leading to more time spent on achieving the desired results. Example: If you apply a complex filter directly to the image layer, you won’t be able to adjust the filter settings and see the real-time impact.
If you apply a complex filter directly to the image layer, you won’t be able to adjust the filter settings and see the real-time impact. You would need to apply the filter, assess the result, and if it’s not what you intended, undo the action and repeat the process until you achieve the desired outcome.
Non-Destructive Editing
Non-destructive editing, on the other hand, refers to techniques that preserve the original image data and allow for easy modification or removal of edits without affecting the underlying image. In Photoshop, non-destructive editing is achieved through the use of adjustment layers, layer masks, and smart objects.
Benefits of Non-Destructive Editing:
- Flexibility: Non-destructive editing allows you to modify or remove adjustments at any point in your workflow, giving you the freedom to experiment without fear of losing the original image. This flexibility is invaluable when you want to fine-tune your edits or try different variations. Example: Let’s say you apply a Curves adjustment layer to adjust the overall tonal range of an image. With non-destructive editing, you can revisit the adjustment layer at any time, tweak the curve settings, or even disable the adjustment entirely if it no longer suits your vision.
- Reusability: Adjustment layers and smart objects can be easily copied and applied to multiple images, saving time and effort in repetitive tasks. This reusability is particularly beneficial when working on a series of images that require similar adjustments. Example: If you have a set of product photos with similar lighting conditions, you can create a set of adjustment layers to correct color balance, contrast, and sharpness. You can then copy these adjustment layers to other images, ensuring consistent edits across the entire series.
- Layer Organization: Non-destructive editing encourages the use of layers, enabling better organization and separation of different edits for enhanced control. This layer-based approach provides a clear visual representation of the editing process and allows for easy management of individual adjustments. Example: Imagine you’re editing a portrait in Photoshop. By using separate adjustment layers for skin retouching, color grading, and sharpening, you can easily fine-tune each aspect of the edit independently. Additionally, you can hide or reveal specific layers to compare the changes and make adjustments as needed.
Drawbacks of Non-Destructive Editing:
- File Size: Working with adjustment layers and smart objects can increase the file size of your Photoshop project, which may be a concern when working with limited storage or slower systems. It’s important to consider the balance between non-destructive editing benefits and the impact on file size. Example: When working with a large number of high-resolution images and multiple adjustment layers, the cumulative file size can become significant, requiring ample storage capacity.
- Learning Curve: Non-destructive editing techniques may require a steeper learning curve initially, as they involve understanding layer masks, adjustment layers, and other advanced features. However, once mastered, these techniques offer greater control and efficiency in your editing workflow. Example: Getting acquainted with layer masks and their applications may take time, but the ability to selectively apply edits to specific areas of an image without affecting the rest is a powerful skill that opens up numerous creative possibilities.
Conclusion: Understanding the difference between destructive and non-destructive editing in Photoshop is vital for any digital artist or photographer. While destructive editing offers simplicity and speed, it comes at the cost of irreversibility and loss of data. On the other hand, non-destructive editing provides flexibility, reusability, and greater control over your edits, although it may require a more advanced workflow and lead to larger file sizes. Ultimately, the choice between these two approaches depends on your specific needs and preferences. However, for
most professional workflows, non-destructive editing is generally recommended to maintain the integrity of the original image and allow for more flexibility in making adjustments throughout the editing process.
Non-destructive editing techniques, such as using adjustment layers, layer masks, and smart objects, provide a range of benefits that outweigh the drawbacks. By working with adjustment layers, you can make targeted edits to specific areas of an image without affecting the underlying pixels. Layer masks allow for precise control over the visibility and opacity of adjustments, enabling you to blend multiple edits seamlessly. Smart objects preserve the original image data and allow for non-destructive transformations and adjustments, such as scaling, warping, or applying filters.
Additionally, non-destructive editing facilitates a non-linear workflow, where you can revisit and modify adjustments at any point in the process. This flexibility is particularly valuable when working on complex or time-consuming projects, as it allows for experimentation, comparison of different editing approaches, and easy fine-tuning of adjustments. It also makes collaborative editing more efficient, as adjustments can be shared and modified without affecting the original image.
Moreover, non-destructive editing supports the concept of adjustment layers and adjustment layer presets, which can be saved and reused across different projects. This not only saves time but also ensures consistency in editing style and results.
While non-destructive editing may initially require a learning curve and result in larger file sizes, the benefits it offers in terms of creative control, flexibility, and the ability to maintain the integrity of the original image make it an indispensable approach for professional image editing.
In conclusion, understanding the difference between destructive and non-destructive editing in Photoshop is essential for achieving desired results while preserving the integrity of your original images. While both methods have their merits, non-destructive editing provides greater flexibility, control, and the ability to make adjustments throughout the editing process. It is widely recommended for professional workflows to ensure efficient and high-quality image editing.