
In the world of graphic design and image editing, Illustrator is a powerful software that offers a multitude of features. One such feature that stands out is the clipping path. Whether you’re a professional graphic designer or a novice exploring the world of digital design, understanding what a clipping path is and how to use it can significantly enhance your design capabilities. In this blog post, we will delve into the concept of clipping paths in Illustrator, explore its applications, and provide you with valuable tips to optimize your workflow. So, let’s get started!
What is a Clipping Path?
A clipping path, in simple terms, is a closed vector path used to isolate a specific portion of an image or illustration in Illustrator. It acts as a virtual mask that defines the visible area within an image, allowing you to display only the desired section while concealing the rest. By using a clipping path, you can remove unwanted background elements, create interesting visual effects, or seamlessly integrate images into different design compositions. This versatile tool grants you precise control over what is shown and hidden within an image, enabling you to create visually appealing and engaging designs.
How to Create a Clipping Path in Illustrator?
Creating a clipping path in Illustrator is a straightforward process. Here’s a step-by-step guide to get you started:
Step 1: Launch Adobe Illustrator and open the image you want to work with.
Step 2: Select the Pen Tool from the toolbar or press “P” on your keyboard.
Step 3: Carefully trace the outline of the desired portion of the image, creating a closed path.
Step 4: Once you’ve completed the path, select both the path and the image.
Step 5: Navigate to the Object menu, choose Clipping Mask, and then select Make.
Step 6: Voila! Your image is now clipped, and only the defined area is visible.
Remember, you can always refine the clipping path by adjusting anchor points and handles using the Direct Selection Tool (A).
Applications of Clipping Path
Clipping paths find extensive applications in various industries, including advertising, e-commerce, and graphic design. Here are some common use cases:
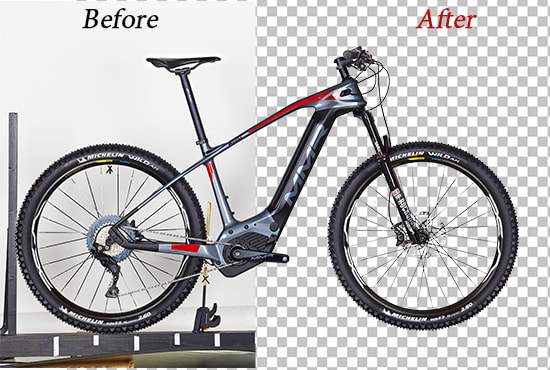
a) Image Manipulation: Clipping paths allow you to remove backgrounds and isolate objects with precision. This is particularly useful in product photography, where you can separate items from their original background, enabling versatile placement in different settings.
b) Graphic Design: Clipping paths facilitate seamless integration of images with complex compositions. By defining specific areas of an image, you can incorporate them into designs, such as brochures, flyers, or websites, ensuring a clean and professional look.
c) Image Retouching: When retouching images, clipping paths provide control over the areas to be edited. Whether it’s adjusting color, enhancing details, or applying filters, you can confine the changes to specific regions, preserving the overall integrity of the image.
d) Print and Packaging Design: Clipping paths enable accurate placement of images within design layouts. With precise control over what’s visible, you can create stunning visuals for packaging designs, magazines, or other printed materials.
Tips for Optimizing Clipping Path
Workflow To enhance your productivity when working with clipping paths, consider the following tips:
a) Use Pen Tool Shortcuts: Familiarize yourself with keyboard shortcuts to speed up the process of creating and editing clipping paths. This will save you valuable time and effort.
b) Refine Path Precision: Take advantage of anchor point adjustments and curve handles to achieve precise and smooth paths. Pay attention to details and ensure that the path accurately follows the desired contours.
c) Save Selections: Once you’ve created a clipping path, save it as a selection. This allows you to reuse the selection later without having to recreate the path from scratch.
d) Experiment with Different Paths: Don’t be afraid to try different paths and variations to achieve the desired effect. Play around with different shapes and curves to create unique and visually appealing designs.
e) Organize Layers: Keep your layers organized by labeling them and grouping related elements. This makes it easier to manage complex projects and locate specific clipping paths when needed.
f) Test for Accuracy: Always double-check your work by previewing the image with the clipping path applied. Ensure that the desired area is visible and there are no unwanted artifacts or missing details.
Mastering the art of clipping paths in Illustrator opens up a world of creative possibilities. Whether you’re editing images for e-commerce, designing advertisements, or creating stunning graphics, understanding how to utilize clipping paths effectively is crucial. By following the steps outlined in this guide and implementing the provided tips, you’ll be able to create precise and visually captivating designs, remove backgrounds with ease, and seamlessly integrate images into various compositions. Embrace the power of clipping paths in Illustrator and elevate your design skills to new heights!