
In the world of digital photography and graphic design, image straightening is a crucial skill that can transform an ordinary photograph into a captivating masterpiece. Whether you captured a crooked horizon or need to align the elements within an image, Adobe Photoshop offers powerful tools to straighten and correct your visuals with ease. In this step-by-step guide, we will walk you through the process of straightening images using Photoshop, enabling you to achieve professional-looking results effortlessly.
Step 1: Launch Photoshop and Open the Image
To begin straightening an image in Photoshop, you need to launch the application and open the specific image you want to work on. Follow these steps to get started:
- Launch Adobe Photoshop on your computer by double-clicking the Photoshop icon on your desktop or searching for it in your applications folder.
- Once Photoshop is open, go to the menu bar at the top of the screen and click on “File.”
- In the dropdown menu, select “Open” to browse and select the image file you want to straighten from your computer’s storage. You can also use the shortcut “Ctrl+O” (Windows) or “Command+O” (Mac) to open the file directly.
- Locate the image file in the file browser window and click “Open” to load it into Photoshop.
The image you selected will appear in the Photoshop workspace, ready for you to straighten and make any necessary adjustments. It’s important to note that you should always work on a duplicate of your original image to preserve the original file and avoid making irreversible changes.
Step 2: Access the Crop Tool
Once you have opened your image in Photoshop, you’ll need to access the Crop Tool to begin the straightening process. The Crop Tool allows you to define the area you want to keep in the image while discarding any unwanted portions. Follow these steps to access the Crop Tool:
- Locate the toolbar on the left side of the Photoshop workspace. The toolbar contains various icons representing different tools and functions.
- Look for the Crop Tool icon, which resembles a square with diagonal lines intersecting it. It is typically the second tool from the top in the toolbar.
- Click on the Crop Tool icon to select it. You can also use the keyboard shortcut “C” to activate the Crop Tool quickly.
After selecting the Crop Tool, you’ll notice that the options bar at the top of the screen will display additional settings and options related to the tool. These options allow you to customize the behavior of the Crop Tool for your specific needs.
Now that you have accessed the Crop Tool, you’re ready to proceed to the next step, which involves straightening the image using a reference line.
Step 3: Straighten the Image
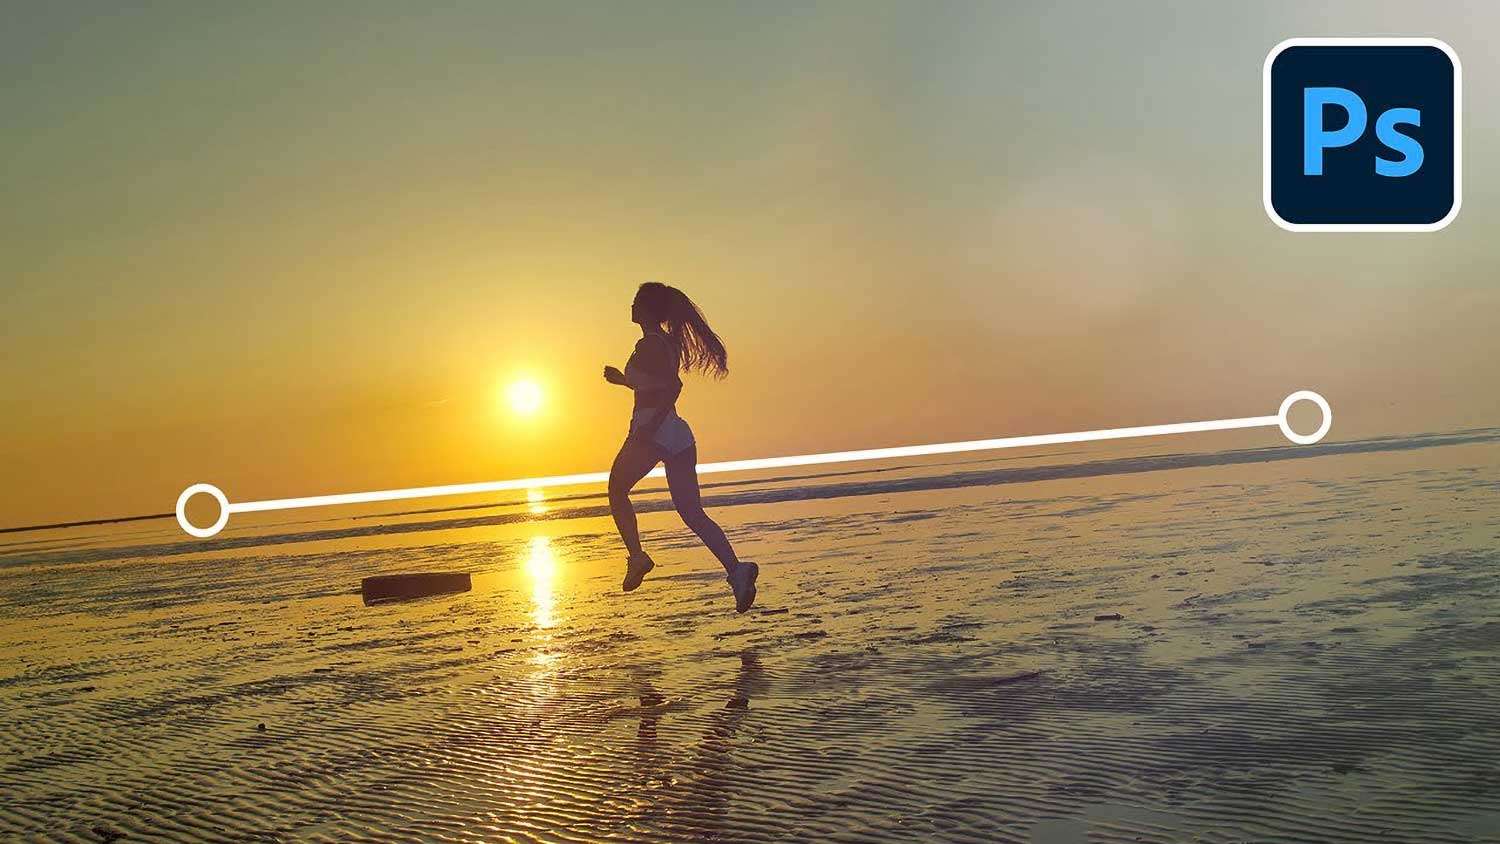
With the Crop Tool selected, you can now straighten the image by aligning it with a reference line. This reference line should be a straight element within the image, such as a horizon, a building edge, or any other clearly defined straight object. Follow these steps to straighten your image:
- Move your cursor to the top area of the image where you want to find a reference line. It could be a horizon, a building edge, or any other straight element that you want to align.
- As you move your cursor over the image, you will notice a small spirit level icon (a circle with a line through it) next to the cursor. This icon indicates that you can use the Crop Tool to straighten the image.
- Click and hold the mouse button while dragging the cursor along the reference line. Make sure the line you trace is as straight as possible.
- As you drag the cursor along the reference line, Photoshop will create a cropping box that aligns with the angle of the line. The cropping box will automatically adjust to straighten the image based on the line you traced.
- Release the mouse button once you have traced the reference line. At this point, the cropping box will be adjusted to straighten the image automatically.
Photoshop uses the information from the reference line to determine the angle of rotation needed to straighten the image. It will then apply the necessary adjustments to align the image with the traced line.
Note: If you find that the reference line you initially traced is not aligned correctly or does not produce the desired straightening effect, simply repeat the process by tracing a different reference line until you achieve the desired result.
Now that you have straightened the image, you can proceed to the next step, which involves adjusting the crop box to finalize the straightening process.
Step 4: Adjust the Crop Box
After straightening the image using the reference line, you can further refine the composition by adjusting the crop box. The crop box determines the area of the image that will be retained, while the rest will be cropped out. Follow these steps to adjust the crop box:
- With the Crop Tool still selected, you will see a bounding box surrounding the image, representing the crop box.
- To adjust the crop box, move your cursor to any of the edges or corners of the bounding box. The cursor will change to a double-headed arrow or a four-sided arrow.
- Click and drag the edges or corners of the bounding box to resize it and refine the composition. This allows you to include or exclude certain areas of the image.
- As you adjust the crop box, pay attention to the image’s straightened elements and ensure they remain aligned with the reference line you traced earlier. This will help maintain the desired straightened effect.
- Continue refining the crop box until you are satisfied with the composition and the areas you want to retain within the image.
While adjusting the crop box, keep in mind the overall composition, subject placement, and any specific guidelines or requirements you have for the image.
Once you have achieved the desired crop box adjustment, you are ready to finalize the straightening process by applying the crop. Proceed to the next step for the finalization process.
Step 5: Finalize the Crop
After adjusting the crop box to your desired composition, it’s time to finalize the straightening process by applying the crop. This step will remove the areas outside the crop box and permanently straighten the image according to your adjustments. Follow these steps to finalize the crop:
- Make sure the Crop Tool is still selected and that you have finished adjusting the crop box according to your preferences.
- Once you are satisfied with the composition and alignment of the straightened elements, it’s time to apply the crop. There are a couple of ways to do this:
- Press the “Enter” key on your keyboard. This will apply the crop and finalize the straightening process.
- Click on the checkmark icon in the options bar at the top of the Photoshop workspace. This icon represents “Apply” and is located on the far right side of the options bar.
- After applying the crop, the areas outside the crop box will be removed, and the image will be permanently straightened according to your adjustments.
- Take a moment to review the resulting image. If you’re happy with the straightening and the overall composition, you can proceed to save your edited image. If you want to make further adjustments, you can use the Undo command (Ctrl+Z/Command+Z) to revert to the previous step and refine the crop box again.
By applying the crop, you have successfully finalized the straightening process in Photoshop. Now, let’s move on to the last step and save your straightened image.
Step 6: Save the Image
After straightening and finalizing your image, it’s essential to save it in the desired format and location. Saving your work ensures that the changes you made are preserved, allowing you to use or share the straightened image as needed. Follow these steps to save your straightened image:
- Go to the menu bar at the top of the Photoshop workspace and click on “File.”
- In the dropdown menu, select either “Save” or “Save As,” depending on your preference:
- “Save”: If you want to overwrite the original image file with the straightened version. However, it’s generally recommended to save your edits as a new file to preserve the original image.
- “Save As”: If you want to save the straightened image as a new file while keeping the original image intact.
- If you choose “Save As,” a dialog box will appear, allowing you to specify the file format, location, and filename for the straightened image.
- Choose the desired format for your image. Common formats include JPEG, PNG, TIFF, or PSD (Photoshop Document).
- Navigate to the location on your computer where you want to save the image.
- Enter a meaningful and descriptive filename for the straightened image.
- Once you have specified the format, location, and filename, click on the “Save” button in the dialog box.
- Photoshop will process and save the straightened image according to your specifications.
Congratulations! You have successfully saved your straightened image. You can now access the image file at the specified location and use it for various purposes, such as printing, sharing online, or further editing.
Remember, it’s always a good practice to keep a backup of your original image file and work on a duplicate or separate copy to avoid any unintended loss of data.
Straightening images in Photoshop is a valuable skill that allows you to correct crooked horizons or misaligned elements, enhancing the visual impact of your photographs or designs. By following the step-by-step guide outlined above, you can easily straighten and adjust your images, achieving professional-looking results. Remember to experiment with different reference lines and crop compositions to find the most visually pleasing outcome. With practice and experimentation, you’ll become proficient in straightening images and creating visually captivating compositions using Adobe Photoshop.